![]()
When you eat healthy and balanced meals, it gives your body the energy and sustenance that it needs to function optimally. Examples of nourishing and high-quality foods include fruits, vegetables, whole grains, legumes, nuts and other lean proteins.
Despite knowing the benefits of eating these foods, sometimes eating healthy is hard. What if you have a busy schedule and there’s a lot on your plate? Maybe you are busy running errands all day, have multiple appointments, work a lot of hours, have family to take care of, or are just plain tired? You want to eat healthier but simply don’t have the time to do it.
These scenarios are quite common, and are a big reason why people rely on getting fast food when there is nothing else to eat. Despite its convenience, fast food is more expensive than home-cooked meals, and contains a lot of salt, fat, and calories.
Imagine within minutes of getting home, you are able to eat a delicious and healthy meal, with leftovers for the following day. This is when meal prepping comes into play. By planning your meals in advance, you are able to eat nutritious and tasty meals even during busy weeknights.

Free Weekly Meal Planner & Grocery List
Do you want to prepare a week’s worth of nourishing and delicious meals, but you don’t know how to get started? Here is a free weekly meal planner and grocery list to make things easier for you. The forms are pdf files that you can either print or complete on a tablet or computer. Click here to download.
Benefits of Meal Prepping
- It is cost effective because you are not eating out as much.
- It’s convenient because the meals are already prepared plus its a huge time saver.
- Cook nutritious meals using fresh ingredients without excess salt, sugar, or fat.
- Attain greater peace of mind because you don’t always need to worry about what’s for lunch or dinner.
Additional Benefits:
It minimizes food waste because you are more likely to use up the ingredients from your fridge before it spoils. You can always store leftovers in the freezer so that you don’t have to toss it out. When you meal prep, you eat less processed foods in exchange for home-cooked meals made with wholesome ingredients. In addition, if you have a health condition like diabetes or kidney disease, meal prepping makes it easier to limit your intake of certain foods. After you are finished cooking, all you need to do is divy the dish into individual servings.
Pre portioning your food will give you a better sense of how many calories, carbohydrates, protein, fat you are consuming at every meal. This method is also helpful when using it for weight management.
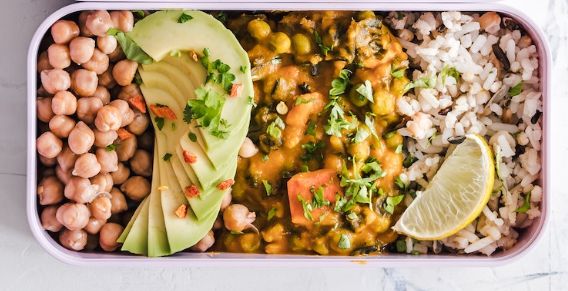
Batch food prep
This is the most common method of meal prepping and involves cooking large quantities of food, then separating it into individual food containers to eat throughout the week.
Ingredient Food Prep
When you prewash, cut and/or season foods in advance to speed up the cooking process/so that the cooking process becomes faster and easier.
Cook to Freeze Meal Prep
Cook specific dishes with the intention of freezing them to consume at a future date. This process extends the shelf life of cooked foods.
General Meal Prep Tips
- Choose a specific day of the week to do your meal prepping, so that it becomes a routine. Sundays are a popular day to meal prep because it is literally at the beginning of the week and you can prepare enough food to last for 4-7 days or more.
- Cook small batches of food to start: If cooking a large quantity of food is too much, then just cook enough to last for 2- 3 days.
- Create a meal plan or menu based on what you want to eat as far in advance as possible. Ideally a week in advance is preferred so that your meals for the entire week are already set.
- Write down all of the foods you have in stock, then use this to create a grocery list. This ensures that you will have all the ingredients needed to prepare delicious meals.
- Decide what you want to eat at least 1 day in advance. This prevents any last minute scrambling that may occur because you are trying to put together a healthy meal….fast.
- Meal prepping your proteins: When you season and marinate meats ahead of time (preferably overnight), it tastes better because the herbs and spices have had extra time to infuse into it. Food safety tip: Remember to put your meat/protein in a bowl on the lowest shelf in the refrigerator to reduce the chance of it contaminating other food.
- Buy individual food containers with compartments. This helps with portion control, plus your meals are ready to grab and go.
- Batch cook your favorite dishes, so that you look forward to eating these meals as leftovers everyday. Soups and stews are ideal because oftentimes they taste better the next day.
Ingredient prepping fruits and vegetables: Examples of foods that can easily be meal prepped include: onions, peppers, carrots, celery, kale, scallions, etc. All you need to do is pre-wash these ingredients, dry with a paper towel, chop/dice or julienne then place them in an airtight food container or zip lock bag for later use. If your produce is particularly dirty, you can pre-wash and scrub it with a vegetable brush, dry it, then store it in clear and open plastic containers. It will stay fresher for longer and is easily accessible when you are ready to use it.
Meal prepping your proteins: When you season and marinate meats ahead of time (preferably overnight) it tastes better because the herbs and spices have had extra time to infuse into it. Food safety tip: Remember to put your meat/protein in a bowl on the lowest shelf in the refrigerator to reduce the chance of it contaminating other food.
Food pantry staples: If you have the space, make sure to have enough non-perishable foods in stock. This way, you are better equipped to whip up a well rounded meal with a few extra ingredients. Examples of pantry staples include: rice, pasta, quinoa, black beans, lentils, spaghetti sauce, nut butters, dried fruit, nuts, seed, stock/broth, canned tomatoes,
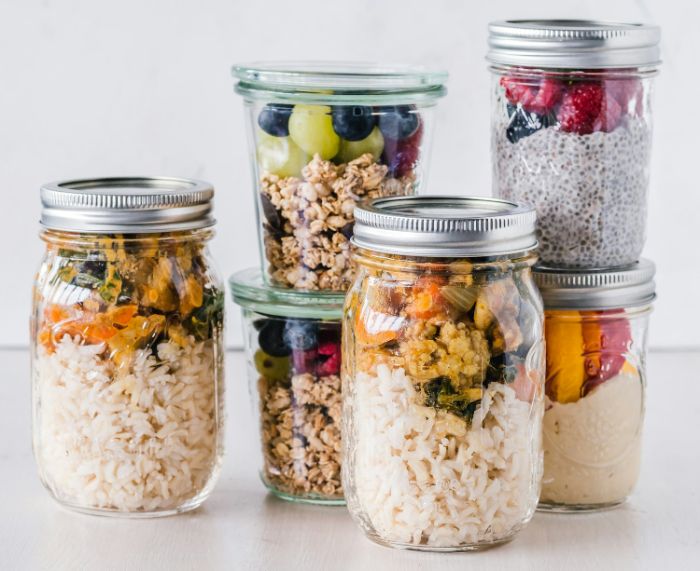
Batch cooking freezer storage: Prepare larger quantities of meals and freeze the rest to eat later. This is especially helpful on busy days when you don’t have time to cook. All you need to do is pop it in the microwave, warm it up and done!
Food Refrigeration Tips
- Refrigerated foods should be stored at a temperature of 40 degrees or below, to maintain its freshness.
- Rotate ingredients and products so that the oldest foods are used first.
- Store perishable ingredients like herbs, fruits, vegetables in the up front and in the center of the fridge and in clear bins so you remember to use them.
- Throw out leftovers after four days. Better yet, use this opportunity to store leftovers in the freezer which preserves it for an even longer period of time. For example, soup can be kept in the refrigerator for 4 days. If you transfer it to the freezer it will stay fresh for 2-3 months.

Salad Jars
This salad can last 4-5 days in a mason jar, if it’s assembled the right way. After you put it together, you will have portable and ready to eat salads, all you need is the cutlery.
Here are 6 steps on how to build tasty to-go salad jars:
- First you add a little salad dressing to a 16 oz glass mason jar. Choose ranch, balsamic vinegar, Italian dressing, whatever dressing you prefer. By adding the salad dressing first, it helps to prevent the rest of the salad ingredients from becoming soggy. No one wants to eat wilted salad.
- Add crunchy vegetables such as radishes, bell peppers, carrots, red onions, right on top of the salad dressing. These ingredients are sturdy and won’t get soft and mushy from being on top of the salad dressing.
- For this layer, add a protein of your choice such as grilled chicken, tofu, edamame, chickpeas, or black beans. You can add the chicken to one layer and add beans on top of that, for extra protein. If you like to eat warm/hot chicken, keep it in a separate little container on top of the mason jar, so that you can reheat it.
- Add quinoa to the next layer to add extra bulk to the salad.
- The next layer can be pine nuts, pumpkin seeds for extra protein and added crunch.
- Leave the lettuce for last. Add lettuce, baby spinach leaves, mixed greens, or any greens that you want right on top.
Tighten the lid on the jar to make sure that air can’t get in. When you’re ready to eat the salad, shake it to mix up all of the ingredients and you are good to go.
